What is a featured post Slider?
A featured post slider is a widget which slides your most recently posts of a selected label automatically in a window or a box.
This article will give you a code and show you how to add a featured post slider widget in your blog that will slide your posts with both tittles and thumbnails from right to left, and this will be done automatically.
Why you should install a featured post slider in your blog?
A featured post slider widget will make your blog appears good and stylish as your blog posts slide within a single box from right to left automatically.
It also helps your readers to see other articles you posted in your blog easily through this slider. Thus make them stay in your blog for long time reading more articles.
Featured post slider code
CUSTOMIZATIONS
- listURL - Replace https://your-blog.com with your blog URL.
- FeaturedNum - Edit the number of posts you want to show in the slider.
- listbyLebel - You can make a slider display your posts by categories. For example, if you want to display Sports category posts, it will be listbyLebel:"sports".
- FeathumbSize - Edit the pixel size of a thumbnail image.
- interval - Edit a time in which a slider takes to slide posts.
- autoplay - you can disable autoplay by replacing the word "true" with the word "false".
STEPS
Step 1: Copy the code from the box above.
Step 2: Sign in to blogger. If you don't have a blogger account you can read on how to create a blogger blog.
Step 3: Select a blog you want add a slider.
Step 4: Click on menu bars at the top left corner and select "Layout" from the menu.
Step 5: Click on "Add a gadget".
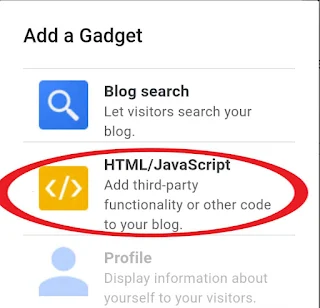
Step 6: Select "HTML/JavaScript".
Step 7: Paste the code in the box.
Step 8: Find listURL:"https://your-blog.com/" from the code then replace https://your-blog.com with your own blog URL.
Step 8: Click "Save".
Preview
After installing a code a slider box will look like on the image below.
You can also read:


